VPN on Raspberry Pi with LAN Isolation
This guide walks through setting up a VPN server (OpenVPN) on a Raspberry Pi using PiVPN and then isolating VPN traffic from your LAN.
Updated: This post has been updated to include instructions for allowlisting IPs for specific clients.
Note: These packages change daily. This was built/documented in Fall 2017 so your mileage may vary.
Not for Wireguard: These instructions apply to the openvpn configuration for pivpn. See instructions for wiregaurd here.
Setup Raspberry Pi
Follow the default installation instructions to setup Raspbian on a Raspberry Pi. I used the Stretch Lite image and had reasonable success.
Make sure packages are up to date
$ sudo apt-get update
$ sudo apt-get upgrade
Install PiVPN
The good folks at PiVPN have made this part dead simple. Kudos to them!
$ curl -L https://install.pivpn.io | bash
Follow the prompts to configure for your particular setup.
I used the following settings, but here is a good guide with more info: How to turn your Raspberry Pi into a Home VPN Server using PiVPN
- Network Interface: eth0
- Local Users: customuser (it’s recommended to not use the default *pi* user)
- Enable Unattended Upgrades: yes
- Protocol: UDP
- OpenVPN port: custom (a non-standard port selection is more secure)
- Encryption level: default
- Public IP vs DNS Name: DNS name (I setup a domain for this, but an IP is okay too if it’s fairly static)
- DNS Provider: up to you
Add a VPN User
$ pivpn add #add 'nopass' option for device connections for which you don't want a password
Add Clients
There are various ways to add .ovpn files to your particular client device. This is beyond the scope of this tutorial.
Network Config
If you are hosting this inside a LAN you will need to open up the port number that you configured above in your external firewall.
Setup firewall
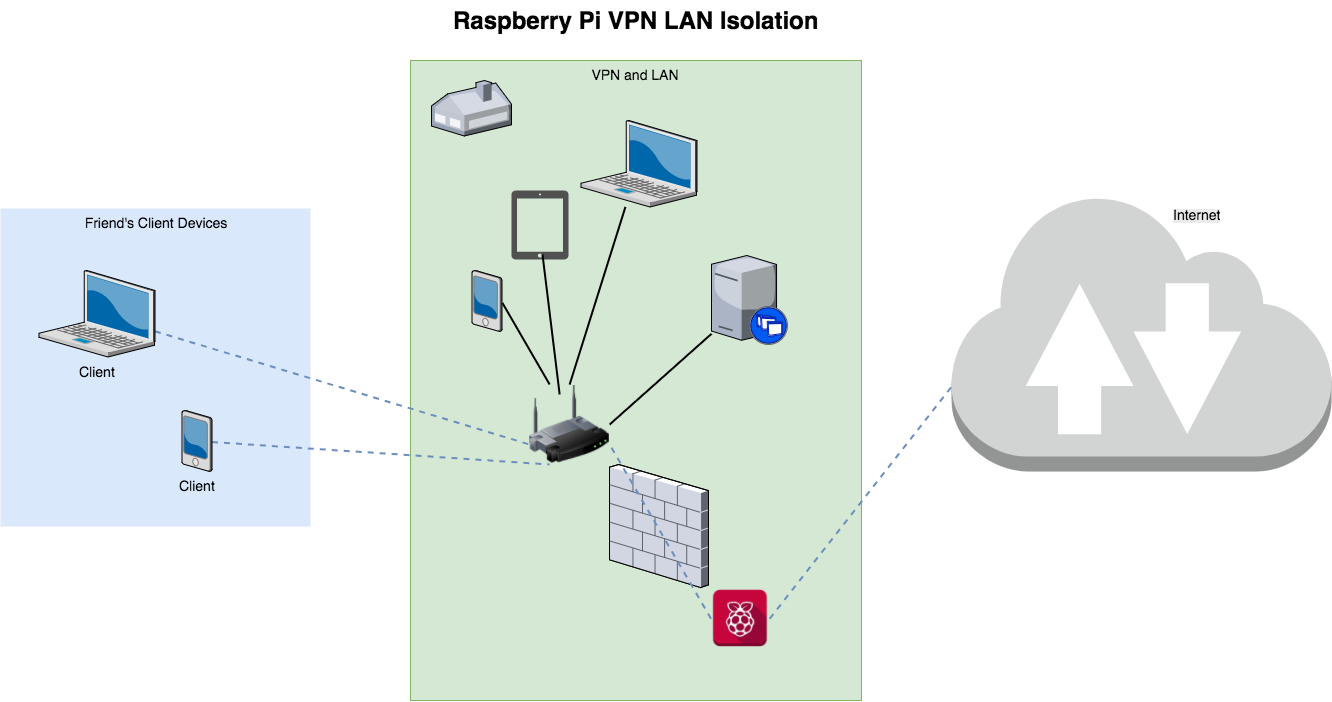
This section assumes that you are hosting this inside your local area network (LAN). If you plan to share your VPN connection with friends, you may want to prevent the VPN from having access to the rest of your network. If you plan to use this entirely for private use, then the extra precautions here are probably unnecessary.
This is not a tutorial on iptables. DigitalOcean and many others have good tutorials.
Add isolation via iptables
In a typical setup, the iptables FORWARD chain is what we need to deal with to isolate VPN traffic from the LAN. This is because traffic to the VPN server is handled by the INPUT chain and traffic from the VPN server is handled by the OUTPUT chain. Traffic destined for another location but transiting the VPN server (your LAN devices for instance) is handled by the FORWARD chain.
Note: If you want to put restrictions on the INPUT, don’t forget to add your VPN port (configured above) to be accepted.
Note 2: If you have configured your Raspberry Pi to be in your router’s DMZ (NOT recommended), then you will definitely want to lock down the INPUT chain.
So, we’ll need to add at least two rules to the FORWARD section to block LAN traffic while allowing traffic to/from the Internet.
- Allow traffic to the Internet/DNS/Gateway/etc. Find your personal routers IP address. We’ll assume 192.168.0.1 for this. Now add a rule to allow traffic.
sudo iptables -A FORWARD -d 192.168.0.1/32 -j ACCEPT - Now block LAN-bound traffic. Check your OpenVPN/PiVPN settings, but for this we’ll use 10.8.0.0/24 for VPN traffic and 192.168.0.0/24 as LAN traffic.
sudo iptables -A FORWARD -s 10.8.0.0/24 -d 192.168.0.0/24 -j DROP
Save iptables configuration
If you want to have the iptables configuration load by default, then follow the instructions here: Persistent Iptables Rules in Ubuntu 16.04 Xenial
Allowlist device for VPN LAN access
There are cases where you may want to allow access to the LAN from certain devices. For you example, you may want your laptop to have unrestricted access while limiting any other users. Here’s what I did, but Marin Nikolov has a great post explaining the details.
Create the client config directory to store client-specific settings.
sudo mkdir /etc/openvpn/ccd
Create a file in that directory with the same name as the profile you’re wanting to allowlist. For example, if you did a pivpn add foo, then create a file named foo in the ccd directory.
In the file, add the following line:
ifconfig-push <IP-to-allowlist> <subnet mask>
Where <IP-to-allowlist> is the openvpn IP you want to reserve for your specific client. For instance, if openvpn is assigning IPs in the 10.8.0.0/24 range, then you might pick 10.8.0.50 for your client. So it would look like this:
ifconfig-push 10.8.0.50 255.255.255.0
Now add the directory to the openvpn configuration so it knows to look there. Edit /etc/openvpn/server.conf and add the following line:
client-config-dir /etc/openvpn/ccd
Now we have to make sure the client gets the same IP address each time. Create a new file under the /etc/openvpn/ directory called ipp.txt and add the following line to it.
<profile name of client>,<IP-to-assign>
So in our example, it would be:
foo,10.8.0.50
Now make sure openvpn knows about this by adding the following line to /etc/openvpn/server.conf:
ifconfig-pool-persist /etc/openvpn/ipp.txt
Okay, let’s restart openvpn now to put the changes into effect:
$ sudo service openvpn restart
Don’t forget to add this allowlisted IP address to your iptables rules:
$ sudo iptables -I FORWARD <position num> -s 10.8.0.50 -d 192.168.0.0/24 -j ACCEPT
Note: It’s important that the allowlisted IPs come before DROP line we added earlier. You can see the order by typing “iptables -L –line-numbers”. Make sure you choose a ‘position num’ that comes before the the DROP line.
And following the instructions above, you can persist these firewall changes.
Conclusion
Okay. That’s it. You should now have a personal VPN hosted in your LAN that prevents VPN traffic from LAN access.
References
- http://www.pivpn.io/
- http://kamilslab.com/2017/01/22/how-to-turn-your-raspberry-pi-into-a-home-vpn-server-using-pivpn/
- https://www.digitalocean.com/community/tutorials/how-to-set-up-a-firewall-using-iptables-on-ubuntu-14-04
- https://help.ubuntu.com/community/IptablesHowTo
- https://askubuntu.com/questions/872852/block-internet-access-and-keep-lan-access-firewall
- https://superuser.com/questions/843457/block-traffic-to-lan-but-allow-traffic-to-internet-iptables
- https://tecadmin.net/enable-logging-in-iptables-on-linux/#
- http://dev-notes.eu/2016/08/persistent-iptables-rules-in-ubuntu-16-04-xenial-xerus/
- Awesome diagram built using https://www.draw.io/
- http://dnaeon.github.io/static-ip-addresses-in-openvpn/